How to Track Offline Conversions from Your Google Ads

Even if you work strictly as a digital marketer, you know that marketing doesn’t take place solely in an online bubble.
Someone who requests a free trial via an online form may have several conversations with salespeople before buying a service.
A homeowner desperately needing a furnace repaired might find a heating company via paid search but then pick up the phone to schedule an appointment.
A shopper might discover a new energy bar via a banner ad and then drive to their favorite grocery store to purchase it.
For many brands, simply tracking online interactions isn’t enough to provide full attribution.
Thankfully, Google Ads offers a few ways to tie offline interactions to your ad campaigns.
In this article, you’ll learn about three methods to track offline conversions in Google Ads:
- Conversion import.
- Call tracking.
- In-store visit tracking.
Importing Conversion Data
Google Ads allows you to import offline conversion data and associate attribution with your campaigns, as long as you have a way of saving the GCLID (Google Click Identifier) for the conversions.
For instance, you may want to import data for closed sales deals that initially entered your CRM via Google search ads.
Setting Up the Conversion
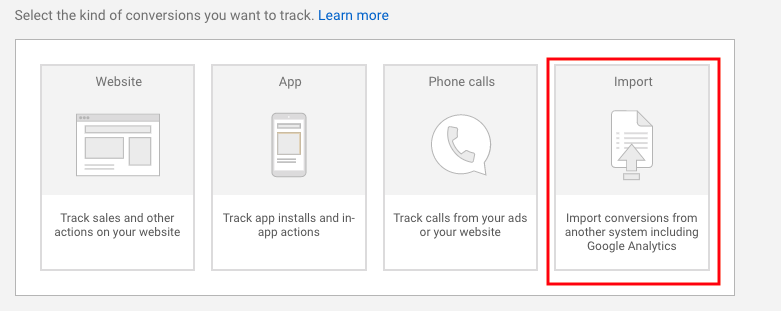
To start, create a new conversion and select “Import” from the list of conversion types.
You can then choose the source you want to import from.
If you use Salesforce, they have a direct integration into Google Ads that allows for importing data based on milestones in the platform.
Otherwise, you can import data via a spreadsheet format.
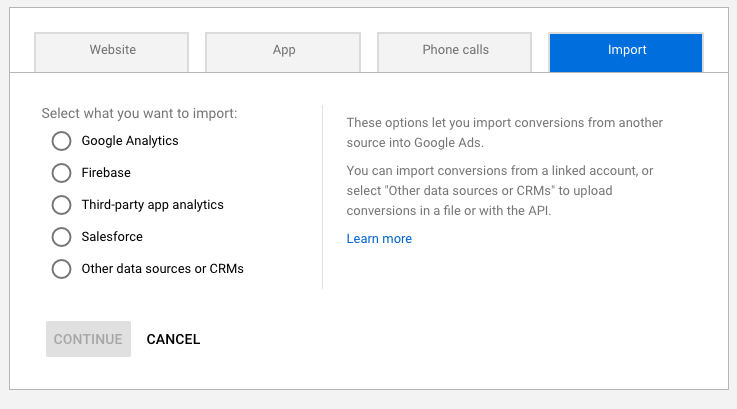
For this example, we’ll choose Other data sources or CRMs.
From here, you can choose to import call-based data or click-based data.
We’ll focus on data from clicks and address calls in more detail further on.
On the next screen, name your conversion and choose the category.
You can associate a specific value or choose a dynamic value if revenue will vary per conversion.
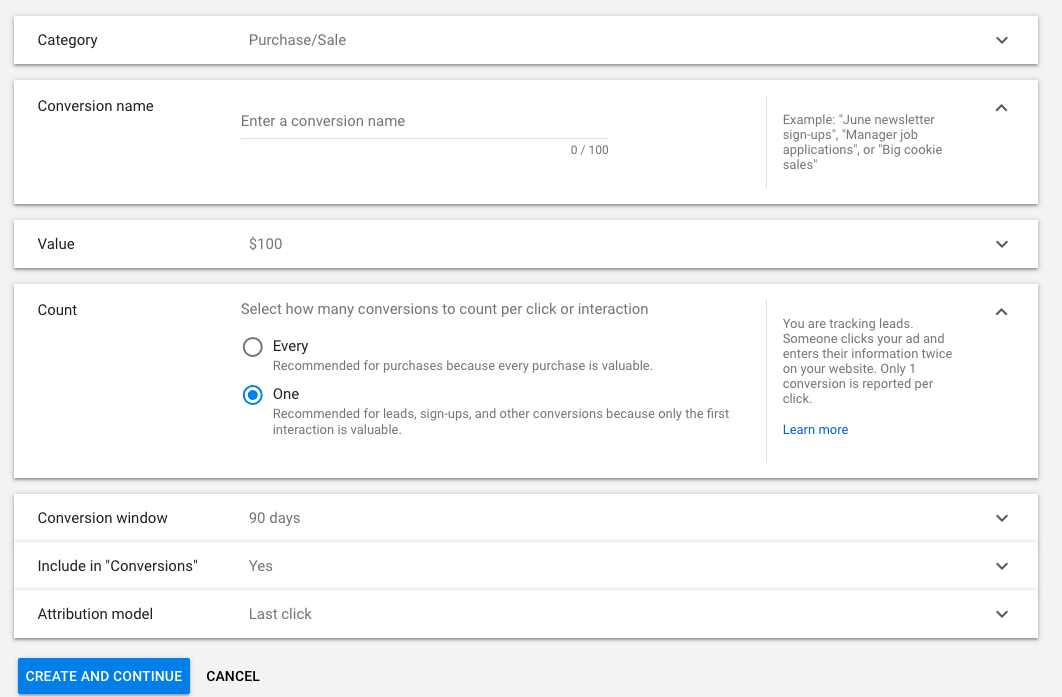
Once you’ve defined all parameters, save the conversion, and you’re ready to start importing data.
Preparing Your Import Template
To import data, start with a template in your desired file format (Excel, CSV, or Google Sheets). Templates are available here.
First, modify the timezone field to reflect the proper time for your region (e.g., Parameters:TimeZone=-0500 for EST).
Next, you’ll need to add the proper data into the sheet with a row for each individual conversion, including:
- Google Click ID: The GCLID associated with the conversion.
- Conversion Name: This should match the name for the conversion in your Google Ads account.
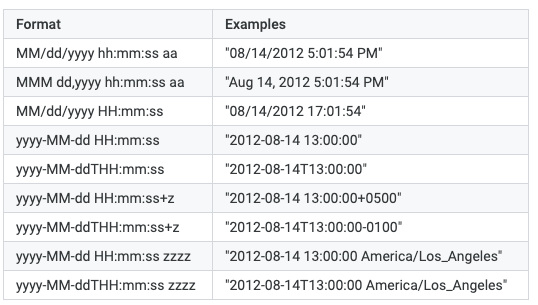
- Conversion Time: The date and time of the conversion. Here are acceptable formats courtesy of Google’s support page.
- Conversion Value & Currency (optional): If you’re tracking revenue, these fields include the associated value of the conversion, as well as the currency, using three-character currency codes. See a list of acceptable currency codes.
Importing the Data
To import the document you’ve prepared, go to the Conversions section of your account and select Uploads from the left sidebar.
Click the plus sign to start your upload.
You can choose to upload a file, sync with a Google Sheets document, or connect to an HTTPS or SFTP hosted file.

Once you’ve uploaded your file, click Preview to ensure that the data is matching to conversions in the account properly.
The results page will flag any errors with your document.
If you’re satisfied with the results, select Apply to sync the conversions with your account.
Note that you’ll need to wait a few hours before the conversions show up in the interface.
Scheduling Uploads
In addition to manual uploads, you can schedule regular data uploads from a Google Sheets document, HTTPS, or SFTP.
This can help save time and automate the process if you can sync a spreadsheet to automatically pull data from your CRM.

Select Schedules, click the plus sign to create a new upload, and choose the source.
Next, you can choose the frequency, which can either be daily or weekly on your defined day and hour.
Phone Calls
For some businesses (particularly those in service industries), phone calls make up the primary source for inquiries. For instance, a tech support client I work with receives around 80% of PPC leads via phone.
If you receive new business inquiries from calls, you should implement some form of phone tracking to be able to attribute these leads properly.
Call Extensions
First, make sure you’ve set up call extensions within Google Ads, allowing a phone number to show up with ads in search results.
Keyword Research Just Got An Upgrade.
We’ve given our keyword research tools an overhaul. Now, get data like you’ve never seen. More keywords, better insight, higher ROI. Try it free.
Navigate to Ads & Extensions > Extensions to begin setting these up.
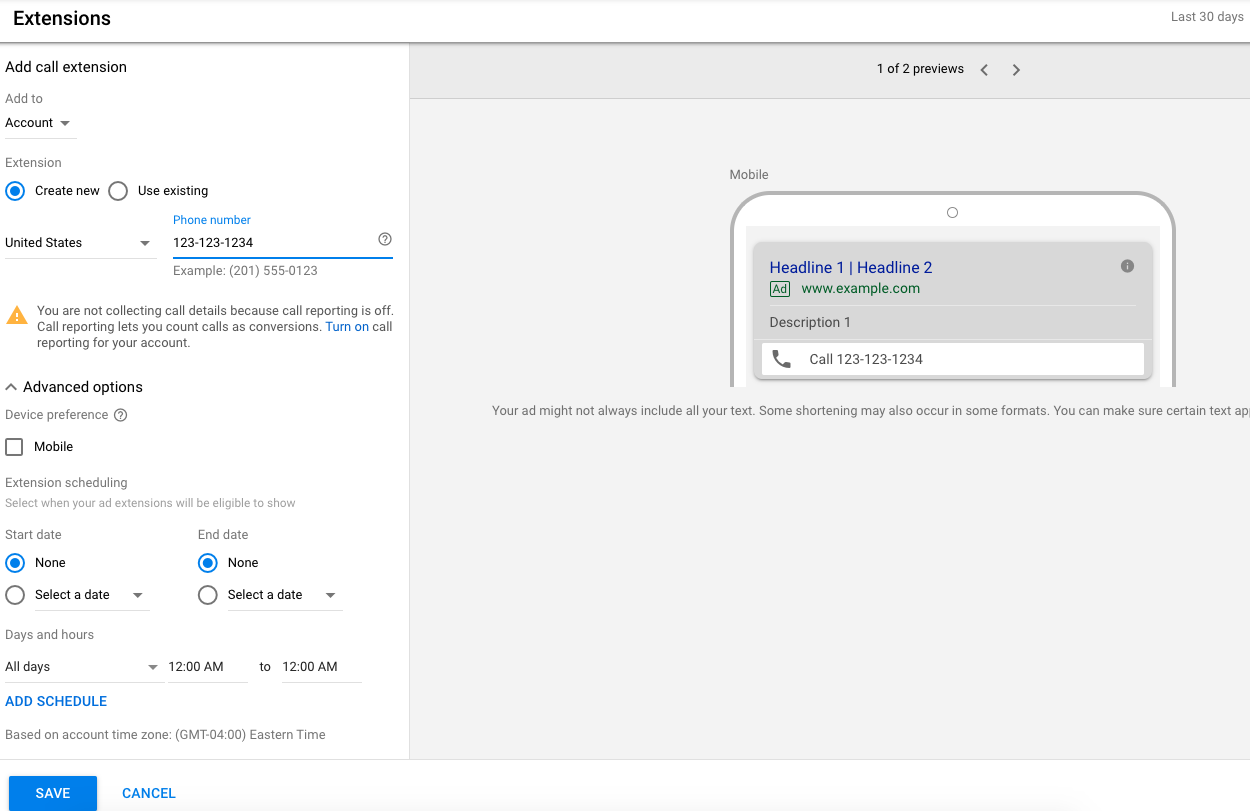
Mobile users will be able to click the number to call the business directly.
You can even try call-only ads to solely present people the option to call when they’re browsing from a phone.
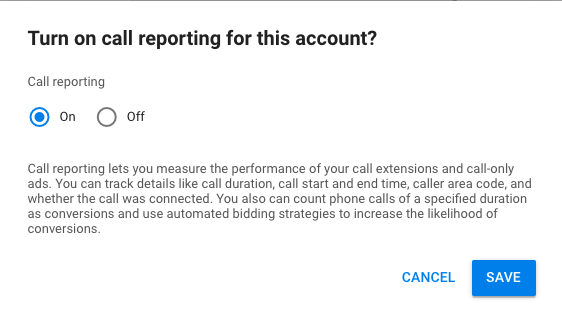
Choose to turn call reporting on to allow a Google forwarding number to be used, which will let you correlate calls down to the ad and keyword level in the account.
You can also choose to count only calls that have a minimum duration.
For instance, my client found that generally, calls lasting longer than 3 minutes and 30 seconds tended to be the most qualified, so we set the call conversion to track only calls with at least 210 seconds.
Website Call Reporting
Next, you should also make sure to track calls from your website.
In addition to ad extensions, Google offers an option to use their forwarding number setup for your site, where users will see a unique trackable number instead of your regular number.
In turn, you’ll see data reflected in your Google Ads account after users call.
Under the Conversions section of your account, create a conversion and select Phone Calls.
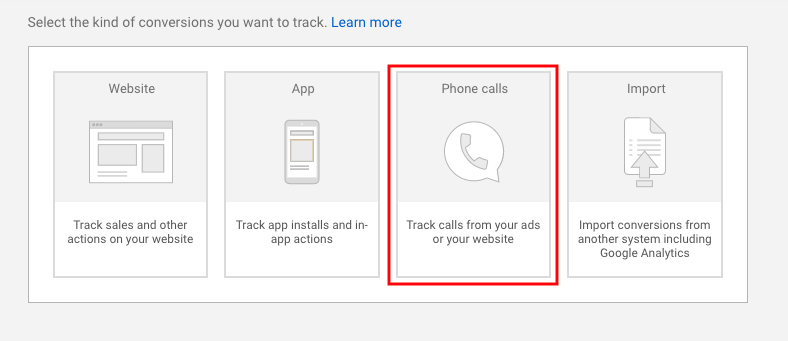
You can choose between:
- “Calls to a phone number on your website” (which requires the use of a forwarding number).
- Or “Clicks on your number on your mobile website” (which doesn’t use a forwarding number but still requires adding a tag to your site).
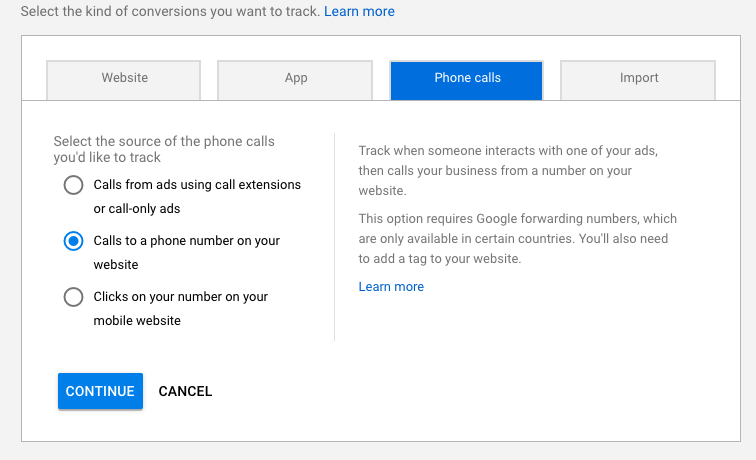
For this example, we’ll go with “Calls to a phone number on your website” to ensure all calls are tracked and call reporting data goes into Google Ads.
You can define the details of the call conversion, including the call length as discussed previously.
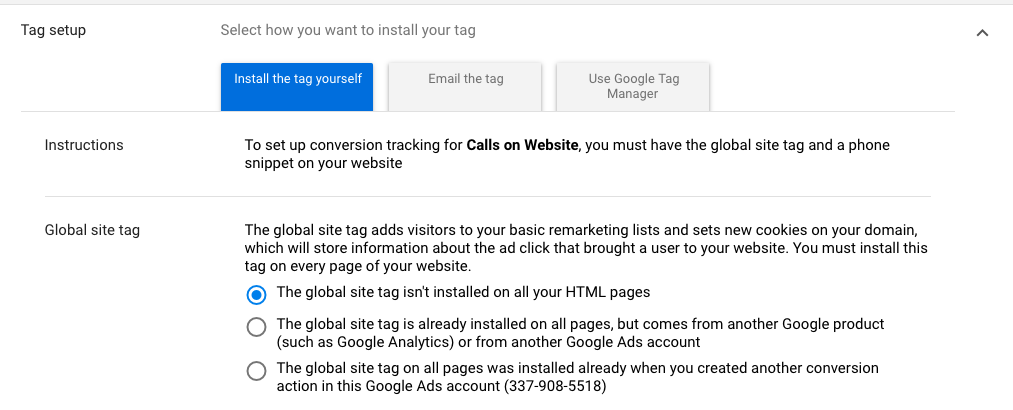
Now, you’ll need to install the tag into your site.
Choose the option most suited to your site setup (depending on whether you have the global site tag installed) and follow the instructions in the interface to place the code.

Once the conversion is enabled and the site tag is configured to track phone calls, you should start seeing call conversions reflected in your account.
In-Store Visits
If you’re promoting sales at a physical location, you can track if people visit after clicking ads using store visit conversions.
Google uses location data from mobile devices to determine if those who previously engaged with or viewed ads came to your store.
Store visit conversions are only available to advertisers who have multiple physical locations and receive high click and impression volume, as well as enough store visit data to meet privacy thresholds. (Unfortunately, Google’s documentation is vague about the exact thresholds to meet).
You’ll need to make sure you’ve claimed your locations in a Google My Business account and verified at least 90% of those.
Next, your Google My Business account should be linked to your Google Ads account.
You’ll also need to activate location extensions in your account.
Once you’ve completed these steps, you should work with an account rep to enable this feature.
Once you start seeing store visit data in your account, conversions will show both in the “All conversions” and “View-through conversions” columns, with a new conversion action named “Store visits” added into reports.
Note that data is anonymous and aggregated, so the numbers won’t be exact.
Google’s documentation indicates that reports will become more accurate with larger data sets, recommending reporting on periods with at least 100 store visits.
Start Tracking Offline Conversions
If you aren’t yet tracking offline conversions, and any of the categories discussed are relevant to products or services you promote, start thinking of conversion points that you can track.
Does your SaaS brand have CRM data that can be imported into Google Ads to reflect sales milestones?
Can you start tracking phone calls for a home services business?
Does your retail brand have sufficient foot traffic to begin tracking in-store visits?
Identify conversions that happen outside of your website, tie them to trackable data you can link to your Google Ads campaigns, and start tracking!